Everything you need to build an export-perfect deck.
A practical, step-by-step guide to SmartDeck AI — from your first prompt to a finished PowerPoint file your committee can open without surprises.
1. Getting started
SmartDeck AI turns a topic into a complete, export-ready presentation. You can try it as a guest and sign in when you want to present, share or export.
Step 1 — type what your deck is about in the prompt box on the home page, then press Generate deck.
Open the home page and type what your deck is about — for example “A 12-slide thesis defense on solar irrigation in Rwanda”.
Press Generate deck. SmartDeck opens the AI builder with your prompt and starts drafting immediately.
As a guest your deck lives in this browser session only. Sign in (or sign up free) to save it, present it, or export it.
Tip — Prefer a guided path? Use New deck to pick a deck type, slide count and audience before any AI runs.
2. Create an account & sign in
An account saves your decks to the cloud so they follow you across devices.
Choose Sign up free, enter your email and a password of at least 8 characters including a letter and a number.
Use the eye icon inside the password box to reveal what you typed before submitting.
Tell us whether you are an adult learner/educator or a secondary-school student, accept the terms, then confirm the verification email we send you.
Forgot your password? Use Forgot password on the login screen — we email a reset link that opens the Set a new password page.
Tip — Signing up with a partner-institution email automatically flags you for preferential pricing.
3. Build a deck with the AI builder
The AI builder is a chat on the left and a live deck preview on the right. Every message refines the deck you can see.
The AI builder: chat and attachments on the left, the live deck and its slide list on the right.
Describe the deck, the audience and how many slides you need in your first message. SmartDeck names the deck automatically from that message.
While SmartDeck works, the chat shows a live step list — reading your request, writing slide content, then applying design & preview — so you always know what stage you are at.
Watch the preview build slide by slide; click any slide thumbnail to inspect it.
Attach your source material with the paperclip: PDF, Word (.docx), PowerPoint (.pptx), Excel (.xlsx), plain text/CSV, images, links, or a recorded voice note. SmartDeck reads the file and builds the deck from its real sections, figures and terminology.
Keep chatting to adjust: “make slide 4 more technical”, “add a methodology slide”, “shorten the bullets”, “add the variance formula”.
When you are happy, open the deck in the editor for fine-grained changes.
Tip — Be specific in one message rather than sending many small ones — it produces better slides and uses fewer deck credits.
4. The guided wizard (New deck)
The wizard is the structured route: pick a type, give your topic, review the outline, then generate.
Step 1 — choose a deck type: thesis defense, lesson plan, research proposal, seminar talk, business pitch, workshop, case study, group project or general.
Step 2 — enter your topic, slide count, language and any group members.
Step 3 — Review outline: edit titles and bullets inline, regenerate a single slide or the whole outline, and preview each slide on the right. History lets you compare and restore earlier drafts.
Step 4 — Approve the outline. A processing timeline shows outline locked, grounding content, writing slides, quality check and applying design, with a live slide counter.
SmartDeck opens the editor automatically when generation finishes; any flagged slide can be retried from the same screen.
Tip — Approve stays disabled until every slide has a title and at least one bullet — the panel lists exactly what is missing.
5. Edit slides in the deck editor
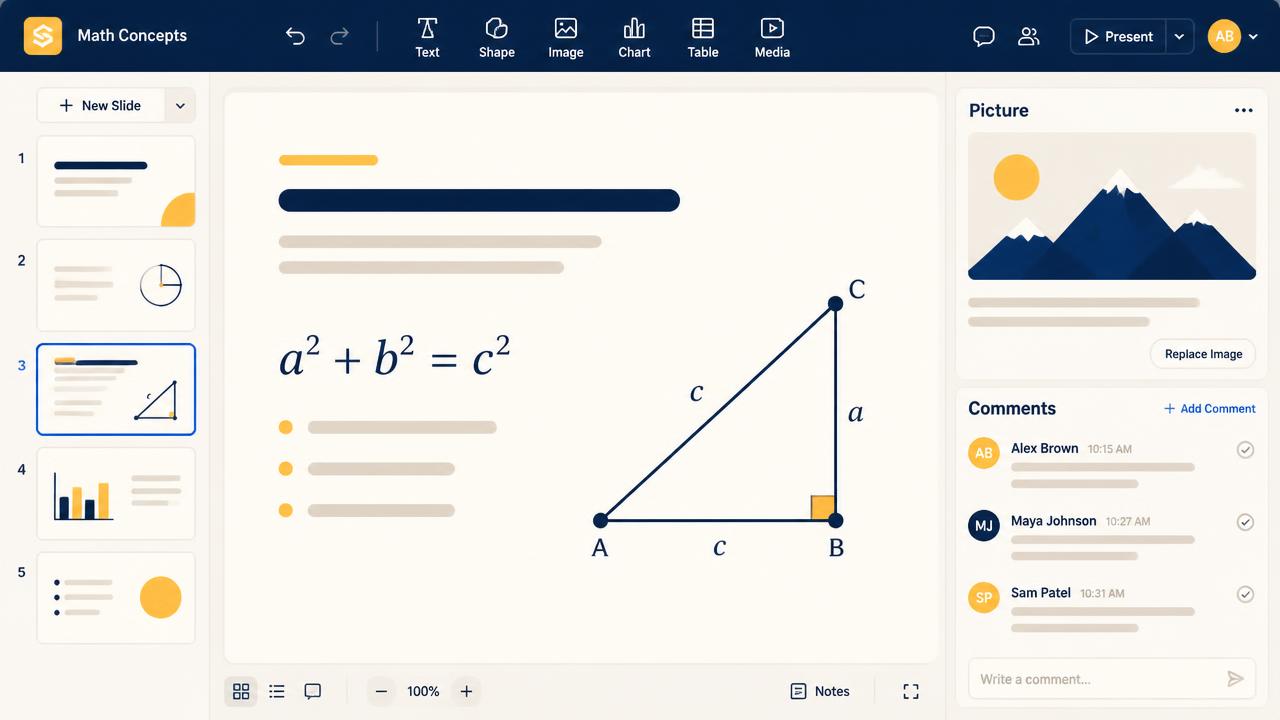
The editor keeps the slide list on the left, the live slide and speaker notes in the middle, and the slide picture plus reviewer comments on the right.
The editor: slide rail, live canvas with rich content (formulas, diagrams, tables, charts), and the picture / comments panels.
Click any text on the slide to edit it in place. Changes autosave — the header shows Saving… then Saved.
Select text to reveal the formatting toolbar: bold, italic, underline, highlight and bullet-level controls apply straight to the slide.
Use Add slide, the ▲ / ▼ buttons on each thumbnail, or Alt + ↑ / ↓ on a focused thumbnail to reorder slides. Ctrl/⌘+Z undoes, Ctrl/⌘+Shift+Z redoes.
On a phone the slide rail is replaced by Prev / Next / Add slide controls above the canvas, so the whole editor still works on a small screen.
Write speaker notes under the preview; they export into the .pptx notes pane.
Rich content — formulas (rendered with KaTeX), code blocks, tables, charts and diagrams (flowcharts, algorithms, circuits, models) — is generated when your topic calls for it and stays editable.
If the same deck is edited in two tabs or devices, SmartDeck stops and asks you to Keep my version or Load latest instead of silently overwriting work.
Tip — Working offline? Edits are kept on your device and sync when the connection returns.
6. Themes, designs & institution branding
Theme controls colour and type. Design controls the visual treatment of each layout.
Open Theme to switch palette and fonts — the preview updates instantly across every slide.
Open Design to pick a PowerPoint-style visual variant with decorative shapes and accents.
Turn on the institution kit to place your school or company logo, name and colours on every slide.
7. Slide pictures
Every slide can carry an AI-generated illustration, diagram, photo or minimal graphic.
For one slide: describe the visual in the Slide picture card on the right, choose a style, then Generate picture.
For the whole deck: press the highlighted Generate all pictures button in the editor toolbar. It fills only the slides that don't have a picture yet, so nothing is paid for twice.
If a picture fails, the slide keeps an amber warning with a Retry picture action — no need to rebuild the deck.
Remove a picture to regenerate it, or replace it with a new prompt.
Tip — Pictures carry readable alt text and are embedded in the deck, so they travel into your PPTX, PDF and PNG exports.
8. Animations, video, sound & GIFs
Slides can animate on entry and carry media. Open the Animation & media card on the right of the editor.
Pick an entrance animation (fade, slide, zoom) per slide; it plays in the presenter view and the share viewer.
Attach a video, audio clip, GIF or a YouTube link. YouTube URLs are embedded automatically.
Add more than one source for the same media — SmartDeck plays the first format your browser supports.
Drag the media inside the slide preview, or use the nudge buttons, to place it exactly where you want; the position is saved with the slide.
While media loads you see a spinner. If it cannot play, the slide shows a plain-language error with Try again and Copy playback diagnostics.
Tip — Autoplay is blocked by some browsers (and Safari is stricter) — press play once and the rest of the run-through behaves normally.
9. Present & export
Preview runs a full-screen presenter view; Export produces real files.
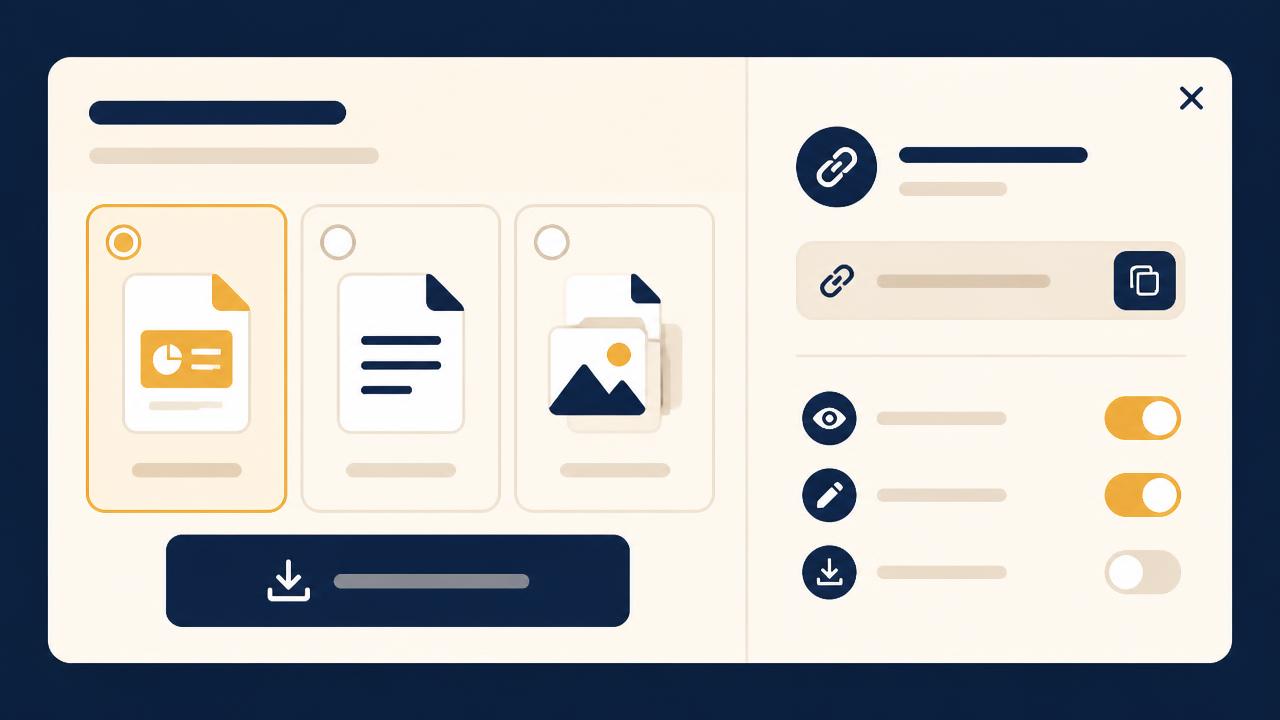
Export gives you real .pptx, .pdf or .zip files named after your deck — and share links with their own permissions.
Press Preview for a 16:9 full-screen run-through — arrow keys, space and Page Up/Down navigate, Esc exits.
Press Export and choose PowerPoint (.pptx), PDF, or PNG images (.zip).
Files are named after your deck title, so “Solar irrigation defense.pptx” downloads ready to hand in.
Large decks stay responsive while exporting — the file is built in chunks with a live progress indicator.
The fidelity check flags anything that might shift when the file opens in Microsoft PowerPoint before you download.
10. Share & collect feedback
Share links let supervisors and teammates review a deck without an account.
From Export & share, create a link and choose whether viewers may comment, and whether a password is required.
Send the link. Viewers page through the deck read-only in the browser.
Comments appear per slide in the editor's Comments panel on the right.
Revoke a link at any time — it stops working immediately.
Password attempts are rate-limited, so a link cannot be guessed by brute force.
11. Manage decks on your dashboard
The dashboard lists every deck with its first slide as the cover.
Search by title to find a deck instantly.
Use a deck's menu to open it, Edit with AI, duplicate, share, export or delete it.
A deck that didn't finish generating shows Retry so you can resume instead of starting over.
12. Plans, payments & deck credits
Start free, upgrade when you need more decks and exports.
Free — 3 decks per month, presenting capped at 5 minutes, export locked. Your dashboard shows the date the allowance resets.
The free plan covers two full months: once you have used up your 3 monthly free decks in two different months, deck generation is locked until you upgrade.
Starter (1 user), Team (up to 3 users) and Business (unlimited users) buy monthly or annual deck-credit bundles; every paid plan can present without a time limit and export every format.
Credit packs are grouped by plan in a selector, with the benefits of each category listed underneath.
Pay with PayPal, Visa/Mastercard card, or mobile money (MoMo). Only the methods your platform administrator has enabled appear at checkout.
A payment you don't finish is kept as a Waiting payment with all its details, so you can come back and complete or discard it at any time.
Extra credits you buy are added on top of your current balance — nothing is reset when you top up.
Generation is metered: a deck consumes credits according to its size and the richness of what is generated (pictures, diagrams, media), and every movement is listed in the consumption ledger with the deck title and type. The ledger is paginated.
Deck usage counts decks created, not decks kept: deleting a deck does not refund a credit or a free-plan deck slot for that cycle.
Have a promo code? Open Billing, enter it in the promo box — codes are issued to one email address, so sign in with that account to redeem it.
At 70% of your credits used, SmartDeck notifies you so you can top up before you run out.
13. Your account, data & privacy
Open Account from the user menu to manage your profile and your data.
Update your display name, language and notification preferences at any time.
Export my data downloads everything SmartDeck holds for you — profile, decks, share links, comments and billing history.
Delete my account removes your profile together with every deck, share link, comment and credit record; it cannot be undone.
Change your password from Account, or use Forgot password on the login screen if you are locked out.
14. Troubleshooting
The quick fixes for the issues people hit most often.
Outline is empty or errored — press Regenerate outline. If it still fails, shorten or clarify your topic.
The model is busy — SmartDeck retries automatically a few times; if it still fails the message tells you whether the model was busy or returned unusable content. Send the request again.
The deck ignored my document — check the “Read from your source” summary in the chat: it lists the sections and figures found and any gaps. PDF, DOCX, PPTX, XLSX, TXT and CSV are read directly; scanned images of text are not, so export them to PDF first.
Out of deck credits — building is redirected to Billing. Top up, or wait for the monthly reset on the Free plan.
A slide came back Flagged — edit it and press Mark as ready, or regenerate that slide.
Picture generation failed — press Retry picture on the slide; the image service rate-limits bursts.
Video or sound won't play — use Try again in the slide's error box, then Copy playback diagnostics and send it to us; add a second source format (for example MP4 and WebM) for the widest browser support.
A payment method is missing at checkout — it is currently disabled by the administrator; use one of the methods shown.
Share link says not found — it was revoked or expired; create a new one.
Deleted a deck but usage did not drop — that is intended: created decks stay counted for the cycle.
The ad box is in your way — drag it anywhere on screen; it also hides itself periodically, and SmartDeck remembers where you put it.
Save conflict — the deck was changed in another tab or device. Choose Keep my version or Load latest in the banner; nothing is overwritten until you decide.
Still stuck?
Reach the team behind SmartDeck at JC Smart Technology. Include your deck title and what you were doing when it went wrong.